Guides · Beginner help
Your first 3D print: a checklist, plus bed levelling and the first layer
A step-by-step checklist for a new printer's first day, from unboxing and placement to bed levelling, the first layer, filament loading and getting the print off the plate.
The first day with a new printer sets the tone. Follow the maker's quick-start guide first: it is written for your exact machine. This checklist fills the gaps that quick-start guides tend to skip, and explains the one thing that causes most failed first prints: the first layer.
Before you switch on
- Read the quick-start guide and safety section in the manual. Keep the box and packaging until the return period ends.
- Remove every transport screw, clip and foam block. Quick-start guides mark them; a missed one can stop an axis moving.
- Choose a stable, level surface with space for the bed to travel if it is a bed slinger. Bambu lists the A1's footprint as 465 × 410 × 430 mm; check yours.
- Pick the room carefully. A ventilated room you do not sleep in is best. The University of Edinburgh's 3D printer guidance, based on HSE research, recommends PLA wherever possible to reduce fumes and particles. See 3D printer safety.
- Plug straight into a wall socket. The London Fire Brigade's electrical items advice says to keep to one plug per socket for high-powered appliances and not to overload extension leads.
- Keep it away from curtains, paper and anything that burns, and fit a working smoke alarm in the room.
Software and network
- Install the maker's slicer or a compatible one, and add your exact printer model so the profile loads. See slicers and where to find models.
- Update the firmware if the printer or app prompts you to, following the maker's steps.
- Decide on cloud or local. Bambu Lab says its printers can be controlled through its cloud service or in LAN-only mode, according to the A1 page.
Calibration and bed levelling
Modern printers do most of this for you, but it helps to know what is happening.
Bed levelling means measuring how flat the bed is relative to the nozzle. No bed is perfectly flat, so the printer probes a grid of points and builds a "mesh". It then raises and lowers the nozzle very slightly as it prints, so the first layer is the same thickness everywhere.
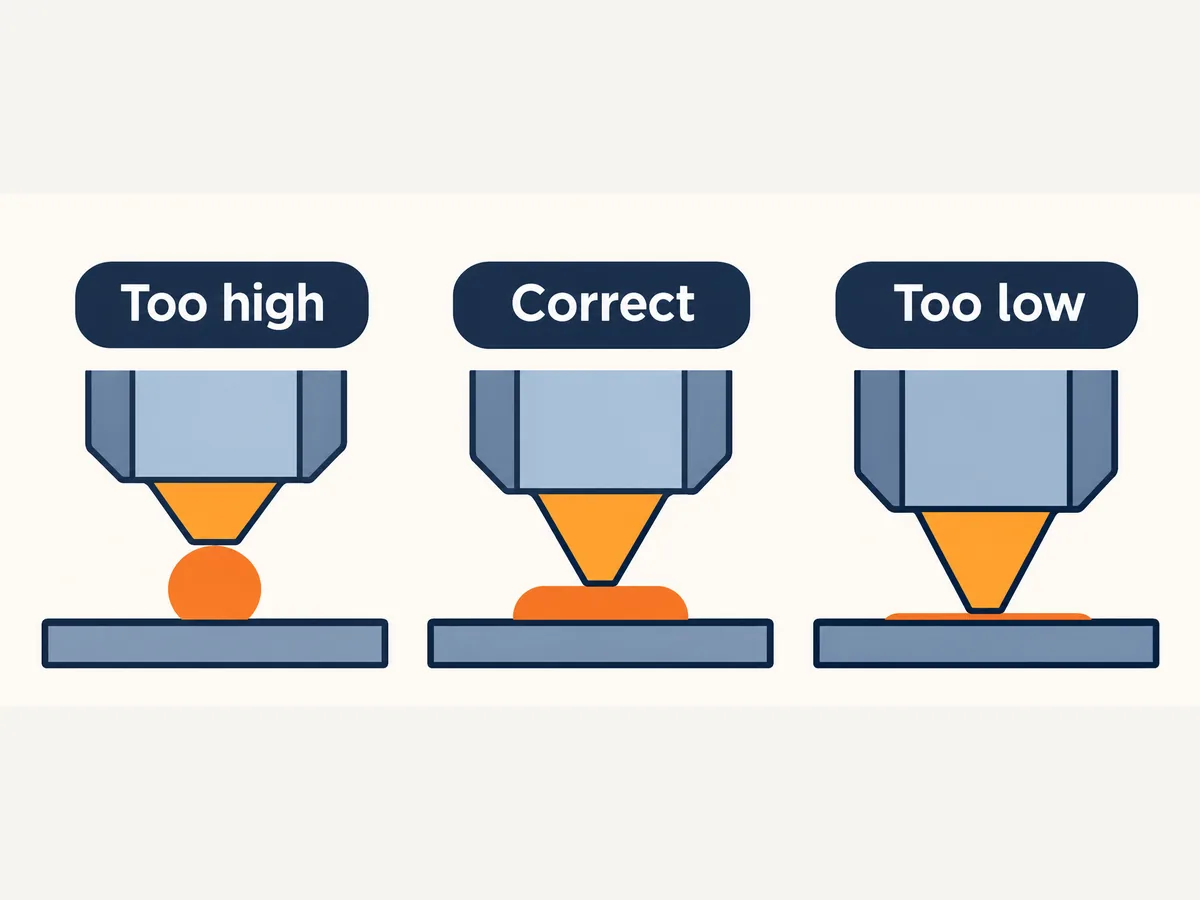
Z offset is the gap between the nozzle and the bed at "zero". Too high and the plastic lies on top as round strands that peel off. Too low and the nozzle scrapes, leaving thin, see-through lines or no plastic at all.
How printers measure it varies:
- Bambu Lab lists full-auto calibration on the A1 mini.
- Prusa's MK4S uses a loadcell sensor in the print head and does automatic mesh bed levelling on the print area only.
- Sovol's SV06 ACE uses a pressure sensor for automatic levelling.
- Creality says the K2 levels only the target print area.
Run the printer's full calibration on day one, even if it takes a while.
The first layer: what good looks like
- Clean the plate. Fingerprints stop PLA sticking. Follow your maker's cleaning advice for the plate type (many PEI plates can be washed with warm water and washing-up liquid; check yours).
- Use the right plate for the material. Prusa's Prusament PLA page lists a 40–60 °C bed and a smooth PEI sheet, glass, painter's tape or glue stick as surfaces.
- Watch the first layer go down. Lines should be slightly flattened and touch each other with no gaps. A smooth, even first layer is the single best predictor of a good print.
- Stop and fix early. If lines are round and lifting, or the nozzle is gouging, stop the print and re-run calibration or adjust Z offset as the manual describes.
Loading filament
- Start with PLA. It is the easiest common material. See PLA vs PETG.
- Hold the free end whenever you unclip it. A loose end that springs back into the spool causes tangles.
- Cut the tip at an angle before feeding it in, if your manual suggests it.
- Use the printer's load function, which heats the nozzle and pushes filament through until it flows cleanly.
Your first print
- Print a small, known-good model, ideally the sample file the maker supplies. Small models fail fast and cheaply.
- Stay with the printer for the first layers and check on it regularly. Do not leave a new printer running while you are out or asleep.
- Let the plate cool, then flex it to release the print. Keep fingers away from the hot nozzle.
When something goes wrong
| What you see | Likely cause | First thing to try |
|---|---|---|
| Print does not stick | Dirty plate, Z offset too high, wrong bed temperature | Clean plate, re-run calibration |
| Rough, scraped first layer | Z offset too low | Re-run calibration or raise offset slightly |
| Stringy hair between parts | Wet filament, temperature too high | Dry the filament; see storing and drying filament |
| Clicking extruder, gaps | Partial clog, tangled spool | Check the spool turns freely; follow the maker's clog guide |
| Corners lifting | Draught, cold room, material warping | Close doors, add a brim, consider an enclosure for ABS/ASA |
How often should I re-level the bed?
Printers with automatic calibration usually probe before each print or on request. Re-run the full calibration after moving the printer, changing the build plate or nozzle, or if first layers start to vary.
Is it normal for the first print to fail?
It is common. Most first-print failures are first-layer or filament problems, which is why the checklist above focuses on them.
Sources
Opened and checked on 15 November 2026.
- uk.store.bambulab.com/products/a1-mini
- uk.store.bambulab.com/products/a1
- www.prusa3d.com/product/original-prusa-mk4s-3d-printer-5/
- store.creality.com/uk/products/creality-k2-combo-3d-printer
- www.sovol3d.com/products/sovol-sv06-ace
- prusament.com/materials/pla/
- health-safety.ed.ac.uk/guidance/hazardous-substances/3d-printers
- www.london-fire.gov.uk/safety/the-home/electrical-items/